If you live in a house with a crawl space, there is a good chance the floor vents are not sealed. This is one of those things that can go unnoticed but have a big impact on your indoor environment over time. The good news is that we have an easy fix you can tackle in a weekend!
We are going to lay out exactly what you need to know how to seal floor vents. First, let’s look at why it is important.
If you have spent any amount of time in your crawl space, you know that it is not a pleasant environment. It is musty, the air is humid and unconditioned, and… well, it is dirty. That is the best case scenario. There is also a chance insects, critters and even snakes are finding their way down there.
Thank goodness there is a solid floor between your living room and the crawl space!
But wait… If unsealed, the air vents in your floor can leave open spaces, up to an inch wide, right into the crawl space.

The EPA estimates 40%-60% of your indoor air could be coming from your crawlspace. And let’s not even think about those critters down there!
Convinced? Let’s get started.
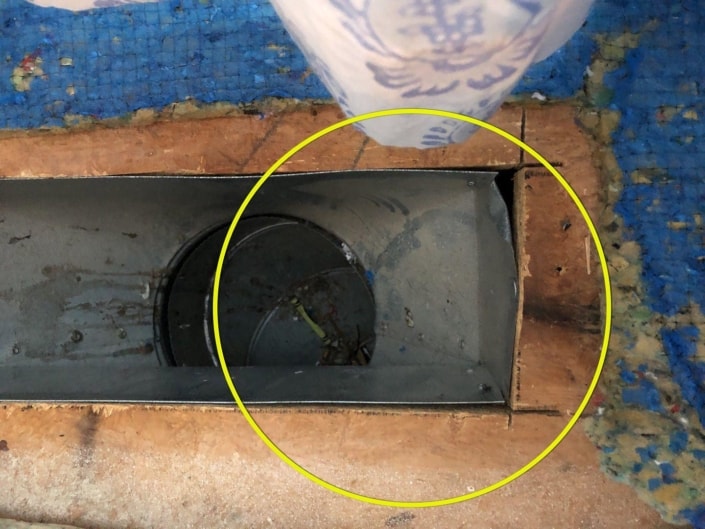
Step 1: Inspect your floor vents.
Check to make sure you have a crawl space, and that you have air vents coming up through the floor. If you do, unscrew one of the floor vent covers and set it aside. Look into the vent, right where the ductwork meets the floor. Is there a gap between the metal duct and the floor? Bingo! You have an unsealed vent.
Step 2: Gather your supplies.
You’ll probably need a quick trip to the hardware store, or if you are planning ahead, use the Amazon links below. (We do receive a small commission if you click the link, but this does not increase your cost.)
- Aluminum Tape
- Water Based Duct Sealer (Mastic)
- Aluminum Window Screen
- Putty Knife
- You will also need a screwdriver, scissors, some paper towels and rubber or nitrile gloves.
Step 3: Tape the vents.
If the vent cover is not removed, unscrew it and set to the side. Wipe off the inside of the metal duct with a damp rag to remove any dust.
Tear the aluminum tape into pieces long enough to cover each of the 4 sides. You should have 2 short pieces and 2 long pieces.
Carefully remove the back of the tape. Make sure you put it where you want it because you only get one shot!
Place the tape so that it adheres to the top few inches of the metal duct, then wraps over onto your floor by about 1/4 inch. Press into place firmly. Repeat for each side, making sure there are no small gaps left in the corners where the pieces of tape meet.
Step 4: Seal the tape
The tape does a great job sealing, but as the metal expands and contracts with seasons it can begin to come loose. That is where the duct sealer comes in.
Use your putty knife to generously coat the aluminum tape with duct sealer. Make sure the sealer extends below the bottom of the tape, but do not put any on your floor. Come up as high as you can without making the turn onto the section of tape directly on the floor.
You need to wait for the sealer to dry, so go ahead and clean up any mess you made and be sure no globs are on your floor. Move on and repeat the process at each of your floor vents.
Step 5: Seal for bugs
The previous step sealed any crawl space air from entering your living space. This step will keep out the bugs.
Make sure the duct sealant is fully dry.
Unroll the aluminum window screen and set over the open vent hole. Be sure you are using an aluminum screen and not fiberglass. That will ensure critters can not chew through.
Cut the screen to be about 1 1/2 inches wider than the opening on each side.
Push the screen into the vent, and make a crease along each of the four sides. The crease will cause about an inch of screen to turn back up along the vent wall. Work the corners to be square. The final product should fit snugly into the vent hole and look a little like a serving tray.
Tear 4 more pieces of aluminum tape, and tape the screen into the vent. Be sure that the screen is a few inches down into the vent, so that your vent cover will still fit.
Replace the vent cover and you are done.

Congratulations! You did it! Your family and home are protected from dirty crawl space air, insects, and other critters. Great job!
WE’RE HERE WHEN YOU NEED US
Having trouble with your indoor air quality? Call Branch Environmental. We’re experts at indoor air quality assessment. We treat each inspection as an investigation. As a company, we believe that no one should live or work in a building that makes them sick. From hidden mold sources to major contaminants, we can identify exactly what is going on in your home and rid it of environmental toxins, often for good.